• Skip to primary navigation
  • Skip to content
  • Skip to primary sidebar
Penny Blogs

Penny Blogs

An insight into the things in life that make me smile

  • Home
  • About Penny
  • Pregnancy
  • Privacy Policy and Disclosure

craft

Attic 24 Inspired Ripple Blanket for a New Baby

August 16, 2019 by Penny Leave a Comment

So many things that I love doing have gone on the back burner over the last couple of years. Crochet, and crafting in general, has been one of those things. I’m desperate to be able to go back to spending evenings curled up on the sofa watching a box set with some crochet in my hands. I think it would probably help me sleep better too.

I’ve also got some wonderful Clothkits kits to make up before TSB’s first birthday in November. I really want to make her some things to remember, like I did for Little Miss C when she turned one, and I’m scared that time will be against me on this. I bought the kids three months ago, but they’re yet to come out of the carrier bag since returning home. It’s shameful really.

There is one project though that I have managed to finish in the last couple of years and it was rather an important one.

Attic 24 Inspired Crochet Baby Blanket

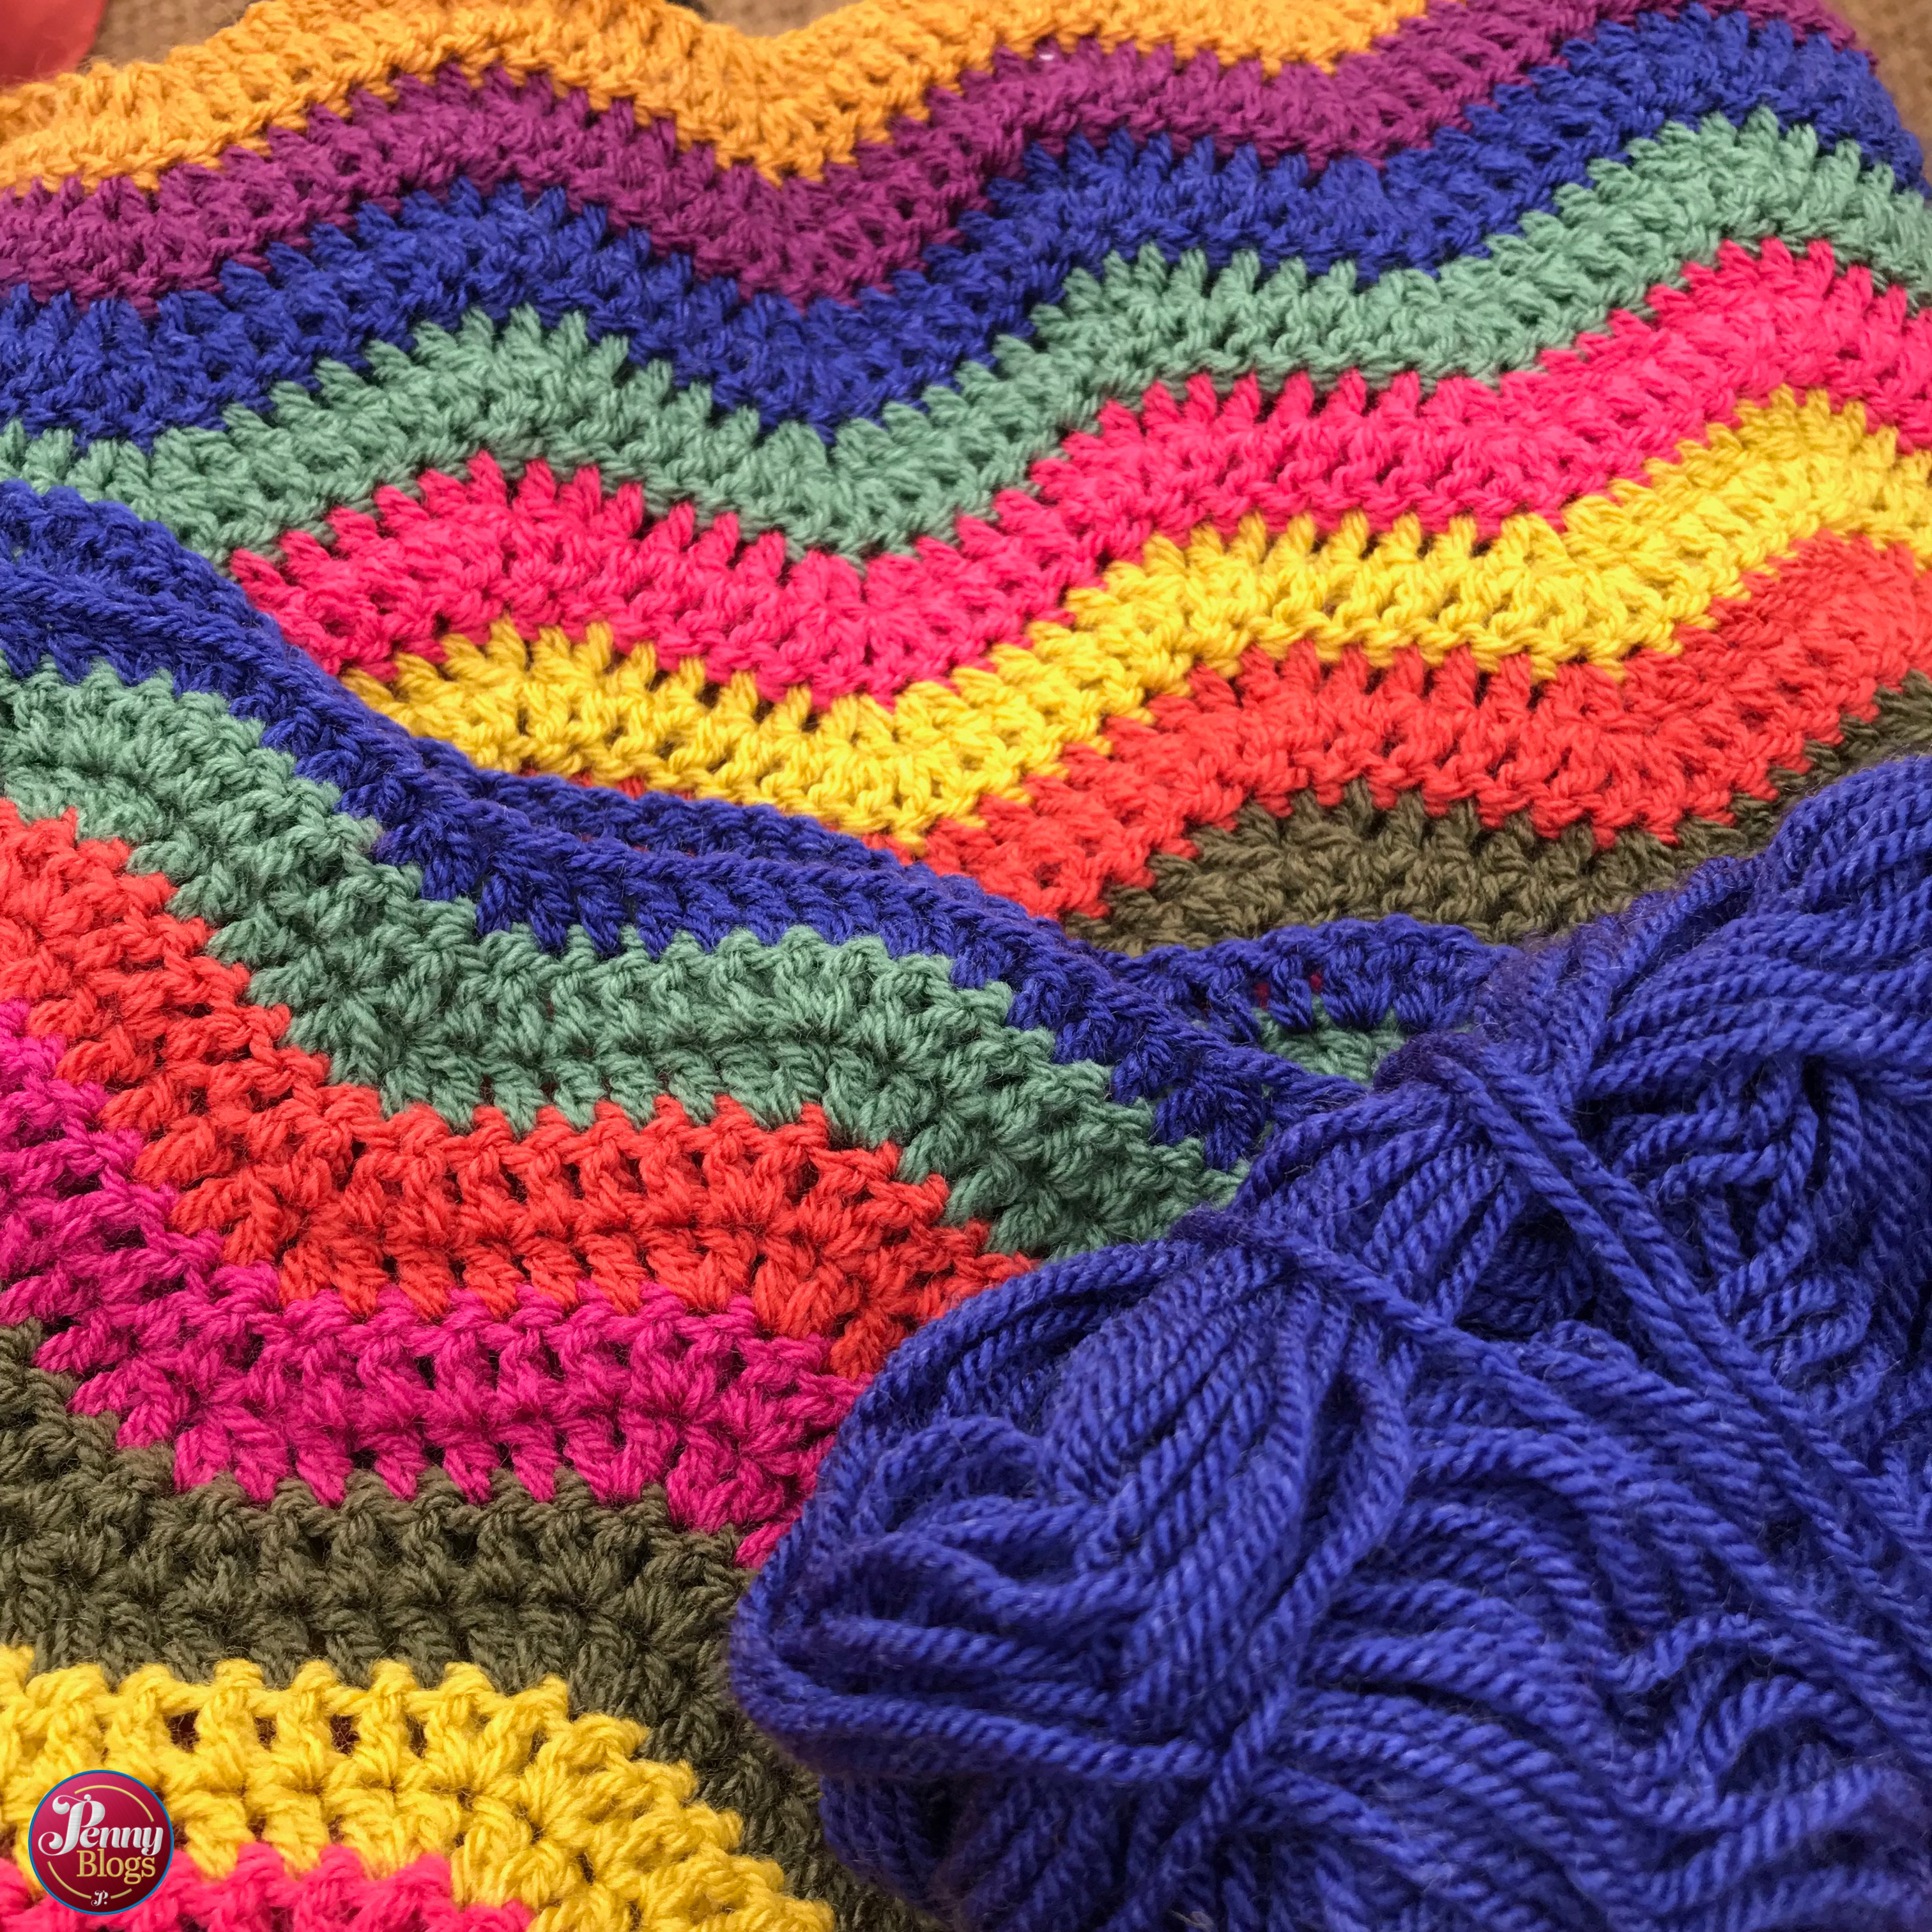
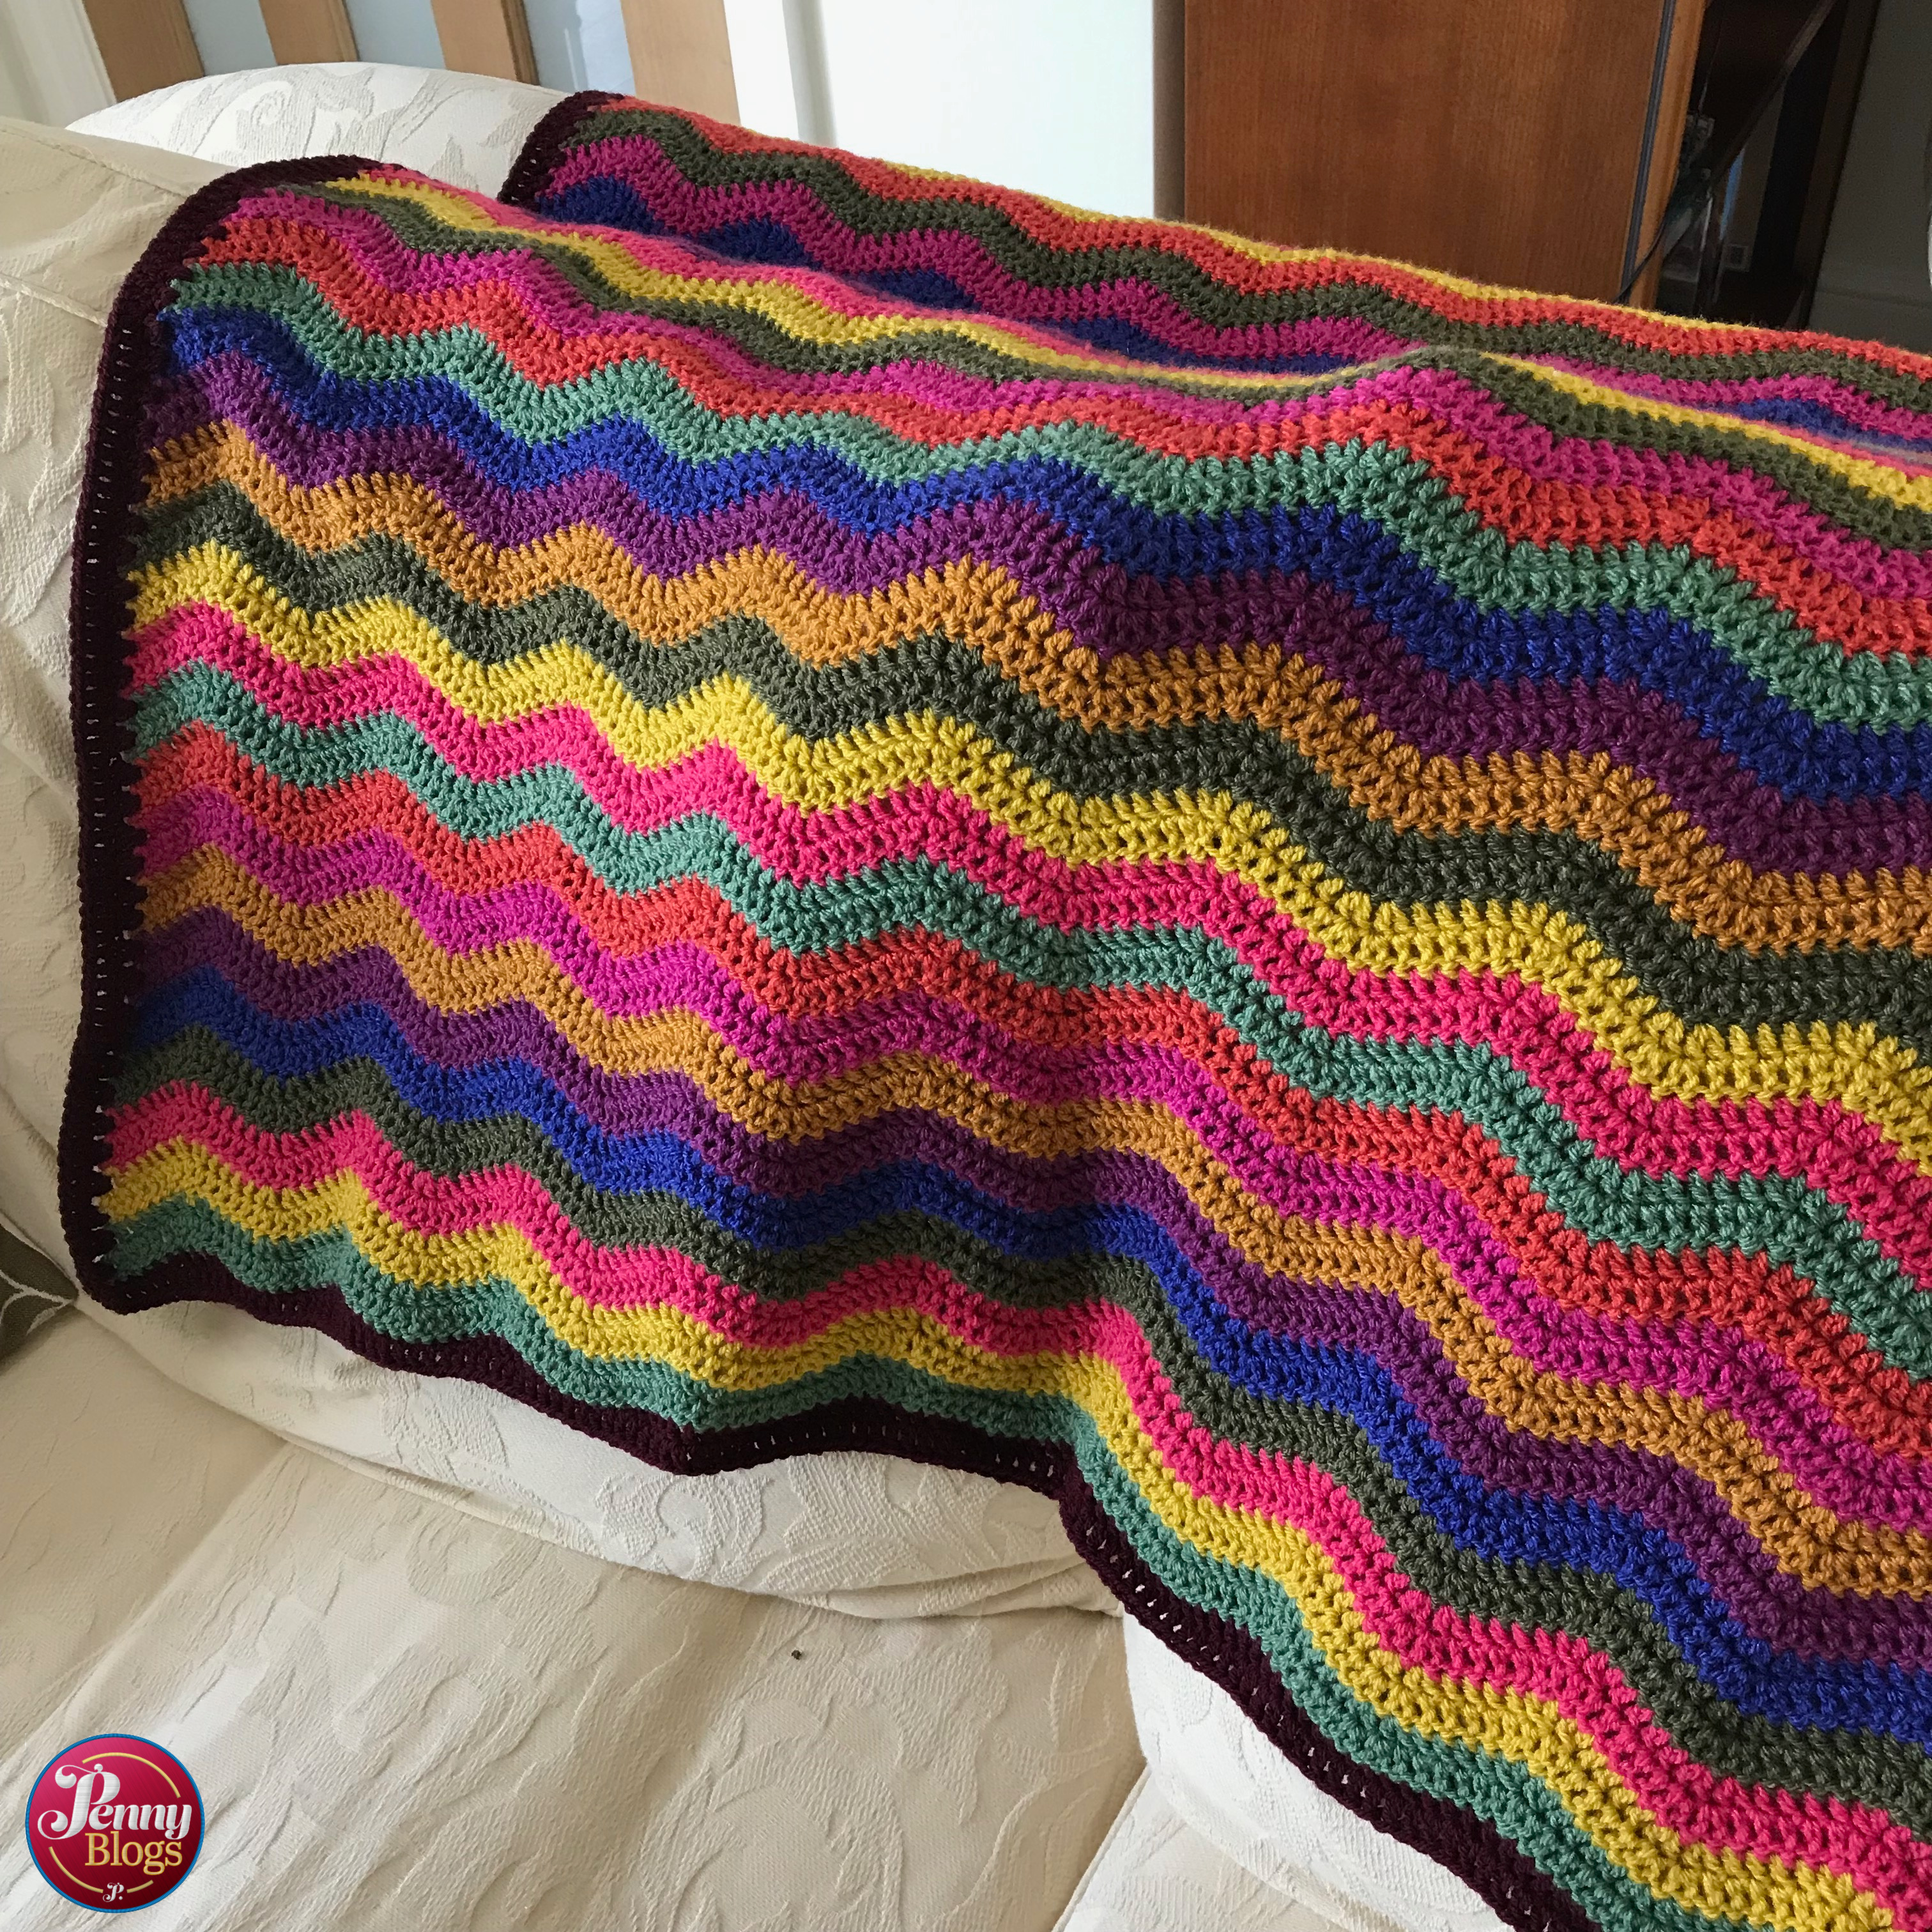
My sister gave birth to her first baby last month and I was determined that this niece or nephew should have something handmade from his Auntie. A crochet blanket seemed the obvious choice and so that’s what I set out to do. My sister didn’t know if she was having a boy or a girl so I wanted to use bright colours that would work for either gender. I managed to raise my leftovers from the various blankets that I’ve made in previous years and came up with a lovely selection of Stylecraft Special DK that I could use.

Attic 24 Inspired Crochet Baby Blanket

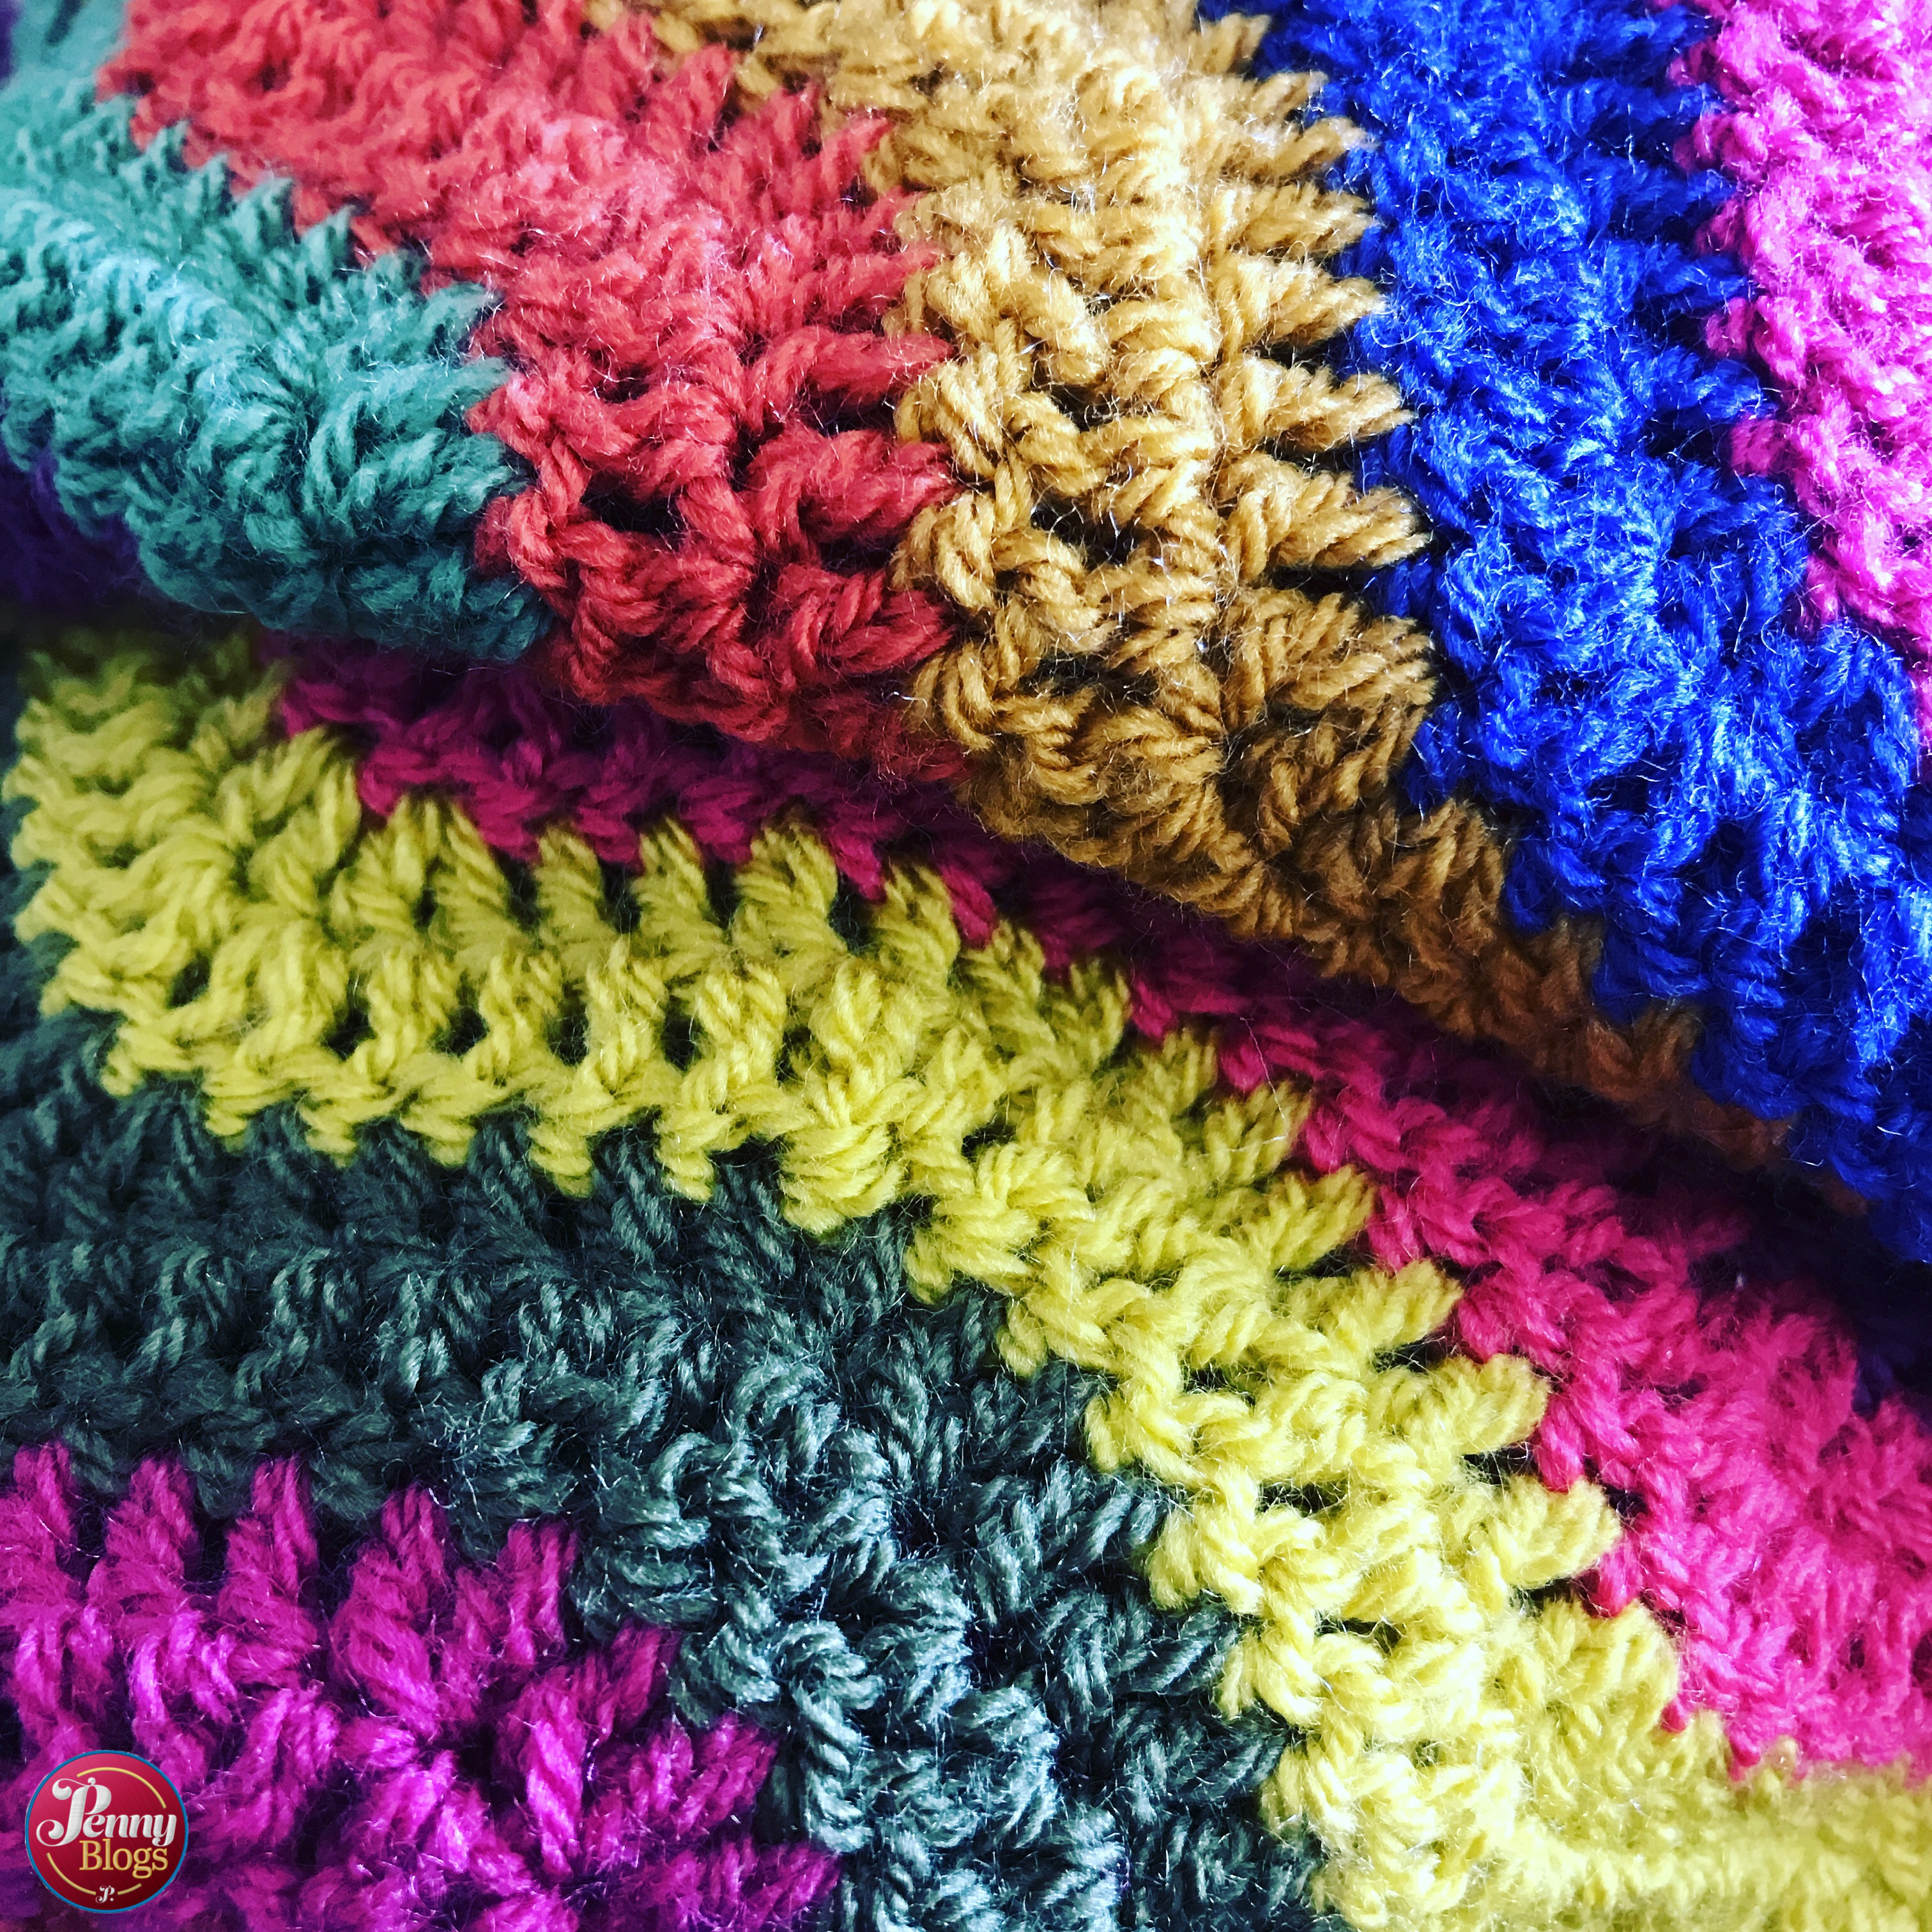
I based my pattern on Lucy from Attic 24’s Ripple Blanket and just altered it so that my foundation row was shorter, so that the final blanket would be a similar size to one that we had for Tube Stop Baby. I then just kept crocheting until it was approximately square in size. I’m not going to lie, it took months, especially as the only real time I had to crochet was when a passenger on long car journeys around the country, but I’m delighted to say that I managed to get it finished about two hours before she gave birth!

Attic 24 Inspired Crochet Baby Blanket

Now I need to just run my attentions to finishing all the other blankets that still need ends sewing in and borders adding. I’m beginning to think that I might just stop sleeping to gain a few extra hours in each day!

Filed Under: Crafting, Crochet Tagged With: attic 24, attic24, baby blanket, craft, Crafting, crochet, handmade, ripple blanket, style craft special dk

Halloween Crafts – Paper Plate Spider’s Web

October 15, 2018 by Penny Leave a Comment

I first blogged about making a paper plate spider’s web as a Halloween craft over on Being Mrs C several years ago. Seeing as Halloween is approaching it seemed the right time to dust off the festive cobwebs and share it again.

Halloween Crafts Paper Plate Spiders Web

I saw a picture of this make on Pinterest (my favourite place online right now – please pop over and follow me if you don’t already) when doing some insect crafts with the kids earlier in the year and knew that it had to be on my Halloween list of things to make. The yarn in my Bostik Bloggers box from Craft Merrily was the perfect prompt. Paper plate spider’s webs are not only easy to make with young children, but they also look really effective and are great for children’s fine motor skills too.

Halloween Crafts Paper Plate Spiders Web

What do you need to make a paper plate spider’s web?

All you need is:

  • Paper plates
  • Scissors
  • Yarn / wool
  • Large tapestry needle (blunt if children are doing the activity)
  • Hole punch

How to make a paper plate spider’s web

Halloween Crafts Paper Plate Spiders Web

The first thing you need to do is cut out the middle of your paper plate. This can be a bit fiddly to start off with and you might need to fold the plate in half to start off your cutting, so it may be best for an adult to do this part.

Halloween Crafts Paper Plate Spiders Web

Once you’ve got just the rim of your plate left use the hole punch to make holes around the inside of it. Space them out a bit, but they don’t need to be very evenly spaced, nor does it matter how many you do. It seemed Little Miss C had never actually used a hole punch before so we now have piles of paper and paper plates all with holes punched in them as she enjoyed doing it so much!

Halloween Crafts Paper Plate Spiders Web

Thread the yarn on to the needle and start lacing it across the inside of the cut out plate. It doesn’t matter if you go in and out of holes you’ve already used, or what order you go round the holes, just try to make sure you’ve used all of them. Putting the needle in from the front or the back of the plate also doesn’t matter. This part of the activity is perfect for children – the holes are big enough for them to easily fit the needle through and it doesn’t matter at all as to what order they lace it all up in.

Try to finish by either going through the same hole where you started, or the one next to it and then just tie a not in the two ends of the thread to secure it.

Halloween Crafts Paper Plate Spiders Web

Finishing touches

These are perfect for hanging up as decorations for a Halloween party and would also work well with a small toy spider attached – as I’ve seen on Pinterest – but it seems that I just can’t find anywhere selling toy spiders this Halloween. I’ve searched all the local shops to no avail. I’ll keep my eyes out though as I think it would be the perfect addition.

Disclaimer: We were sent a box of craft goodies as part of our role on the Bostik Family Craft Bloggers Network when this blog post was first published. This post contains affiliate links.

Filed Under: Childrens Crafts, Crafting, Halloween Tagged With: Childrens crafts, craft, Crafting, Halloween, KIds Crafts, paper plate crafts, Spiders Web

Plastic Poppies: A Remembrance Day Craft

June 15, 2018 by Penny Leave a Comment

It used to be that all Remembrance Sunday or Remembrance Day poppies all looked the same. Occasionally you would get a handmade one, but they generally just followed the same uniform design. Then it seems the internet came along. The combination of sites and apps like Pinterest and Instagram seems to have coincided with more people making (and showing off) their own creations.

I’ve crocheted my own poppies before, but this time round I’m making plastic poppies as part of a piece of work that my WI is undertaking for a local event. I’ve set up a bit of a kitchen table production line to make plastic poppies which can be done very simply from plastic bottles. Here’s how.

What you need

  • Plastic drinks bottles – any size will do
  • Stanley knife or similar
  • Fine sandpaper
  • Red acrylic paint
  • Black acrylic paint or black sharpie pen
  • Paint brush

How to make the poppies

Firstly, use the knife to carefully cut the bottom off a plastic drinks bottle. I suggest cutting just above any dimples on the base of the bottle. These give the finally poppy a bit more shape. The remaining part of the bottle can be recycled.

Plastic Poppies Remembrance Day Remembrance Sunday

Once you’re bottle bottoms are detached, use either the knife or sandpaper to remove any sharp edges. If you’re planning on doing this craft with children you might want to do everything with the knife before getting them involved.

Plastic Poppies Remembrance Day Remembrance Sunday

Paint the inside of the bottle bottoms with two (or more) coats of red acrylic paint. Experimentation told me that two was sufficient to give complete coverage, but you may need to do more depending on the plastic bottles you are using.

Once the red paint is dry, use either black paint or black sharpie to colour in the centre of the poppy. The texture of the original bottle may mean that one method works better than the other.

And there you have it – plastic poppies, made from recycled drinks bottles. An easy, yet effective, Remembrance Day craft, that also makes use of plastic that might otherwise end up in landfill.

Disclaimer: This post contains affiliate links.

Filed Under: Crafts Tagged With: craft, crafts, crafty, plastic bottles, poppies, poppy, recycling, remembrance day, remembrance sunday

Primary Sidebar

Google Ads

Categories

  • Baking
  • Blogging
  • Books
  • Business
  • Car Boot
  • Childrens Crafts
  • Collaboration
  • Corona Diary
  • Crafting
  • Crafts
  • Crochet
  • Days Out
  • Decorating
  • DIY
  • Environmental
  • Family
  • Fashion
  • Films
  • Finances
  • Fireworks
  • Food and drink
  • Gardening
  • Gifts
  • Halloween
  • Health and Fitness
  • Home
  • Interiors
  • Knitting
  • Life
  • Moving house
  • Music
  • New house
  • Outdoors
  • Parenting
  • Pregnancy
  • Relationships
  • Romance
  • Sewing
  • Simple things
  • Swimming
  • Television
  • Thrifty
  • Travel
  • Upcycling
  • Vintage
  • Womens Institute
  • Work

Penny on Amazon

Want to find out what I’m recommending over on Amazon at the moment? Take a look here.

Copyright © 2023 · Genesis Sample on Genesis Framework · WordPress · Log in